Monday, July 30, 2012

Bane Knights & Bloodgorgers

Made good progress on a couple of Cryx infantry units over the weekend, so finished them off today and thought I'd do a mid-week update.

The first is a unit of Bane Knights. The steel was weathered using the techniques listed in the tutorial I posted last weekend. The bronze was aged with a turquoise ink wash.


The cloth was done with Foundry Deep Maroon.


The second unit is the rest of the Bloodgorgers. These were completed just like the unit leader, who was painted up last weekend.


Had fun getting the blood splatters onto all the weapons and armor.


'Til next time.

Friday, July 27, 2012

Tutorial: Weathering Metal Armor

A couple of months back, I promised a tutorial on distressing and aging metal without using weathering pigments. I was going to show this on some Cryx Bane Knights. Well, here is the tutorial (finally), but on a Bloodgorger model instead. Plenty of armor to weather here!


So, we start with the model assembled, primed white, inked black and based.


Normally, I'd work from the skin outwards, but there is so much metal on the figure there will be a lot of messy drybrushing. Best to do the metal first and then go back in and paint the skin and other details later.

For the iron armor, start with a very thin coat of Reaper Shadowed Steel. This is a bluish metallic, which creates a very nice undertone to work with. Keep all layers ultra thin...there will be plenty of them to build up the color.


Next, a wash of umber.


As you can see here, this creates the first layer of rusty grime.


A light drybrush of Honed Steel, which is the shade up from Shadowed Steel.


Then another light drybrush, this time with Polished Silver.


The silver drybrush pops out the rivets and plate edges.


And now add the final wash...this time sepia.


This is a lighter color than the underlying umber, so it adds some tonal contrast and sets up a nice base for the rust that will come later.


At this point add a final light drybrush of Polished Silver to accentuate edge wear on the steel plates.


Now move onto the bronze metal areas. For this, I wanted to try out the new GW series paints and their recommended progression for bronze. It starts with Screaming Bell (hate the new GW names). Screaming Bell is really red...it's more like a copper color than a bronze base...but what the hell.


This close up shows the color's tone.


Instead of GW's Reikland Fleshshade wash, which is recommended at this point in their bronze progression, I used my own gold wash, which is a mix of dark orange ink and matte medium.


This wash adds the appropriate shadows to the bronze base.


Next, a couple of GW layer paints, lightly drybrushed on. The first is Hashut Copper.


And the second is Sycorax Bronze.


These colors leave the bronze with a distinct reddish tone. I'd say it's more coppery than is should be...but that's just me.


The final step in the new GW progression is Golden Griffon, which is what they call a dry pigment. These "dry" colors are very thick, pigment-heavy pastes, which seem kind of like half-dried-out paint pots. Fine for drybrushing.


The bronze is brightened up a little at this point.


The final stage here is to add a light wash of sepia. This ties the bronze areas back in with the steel.


The final look of the bronze.


OK, time for a little rust application. Here are the Reaper and Vallejo colors used. As usual, these paints are cut with water and then a drop of rubbing alcohol is added to break surface tension. Dab the various tones onto the metal areas. Concentrate your dabs around rivets and in the folds of the plates.


This stage really ages the metal nicely.


Again, add a really light drybrush of silver at this point to bring the edge wear back up.


The silver drybrush can be added to the bronze areas as well to highlight their edges.


Add in blood splatters at this point. Load a brush tip with brown ink and then blow it onto the weapon edges, and lightly onto areas of the armor. Follow this up with red ink (again, blown off a brush tip).


Now our Bloodgorger looks like he's right in the middle of a fierce battle.


At this point, the metal is done. It is aged and weathered, and ready to go.


Go in and paint the skin (Reaper Olive Skin tones for this guy).


Leather, cloth, bone and the final gear details can be added at this point.


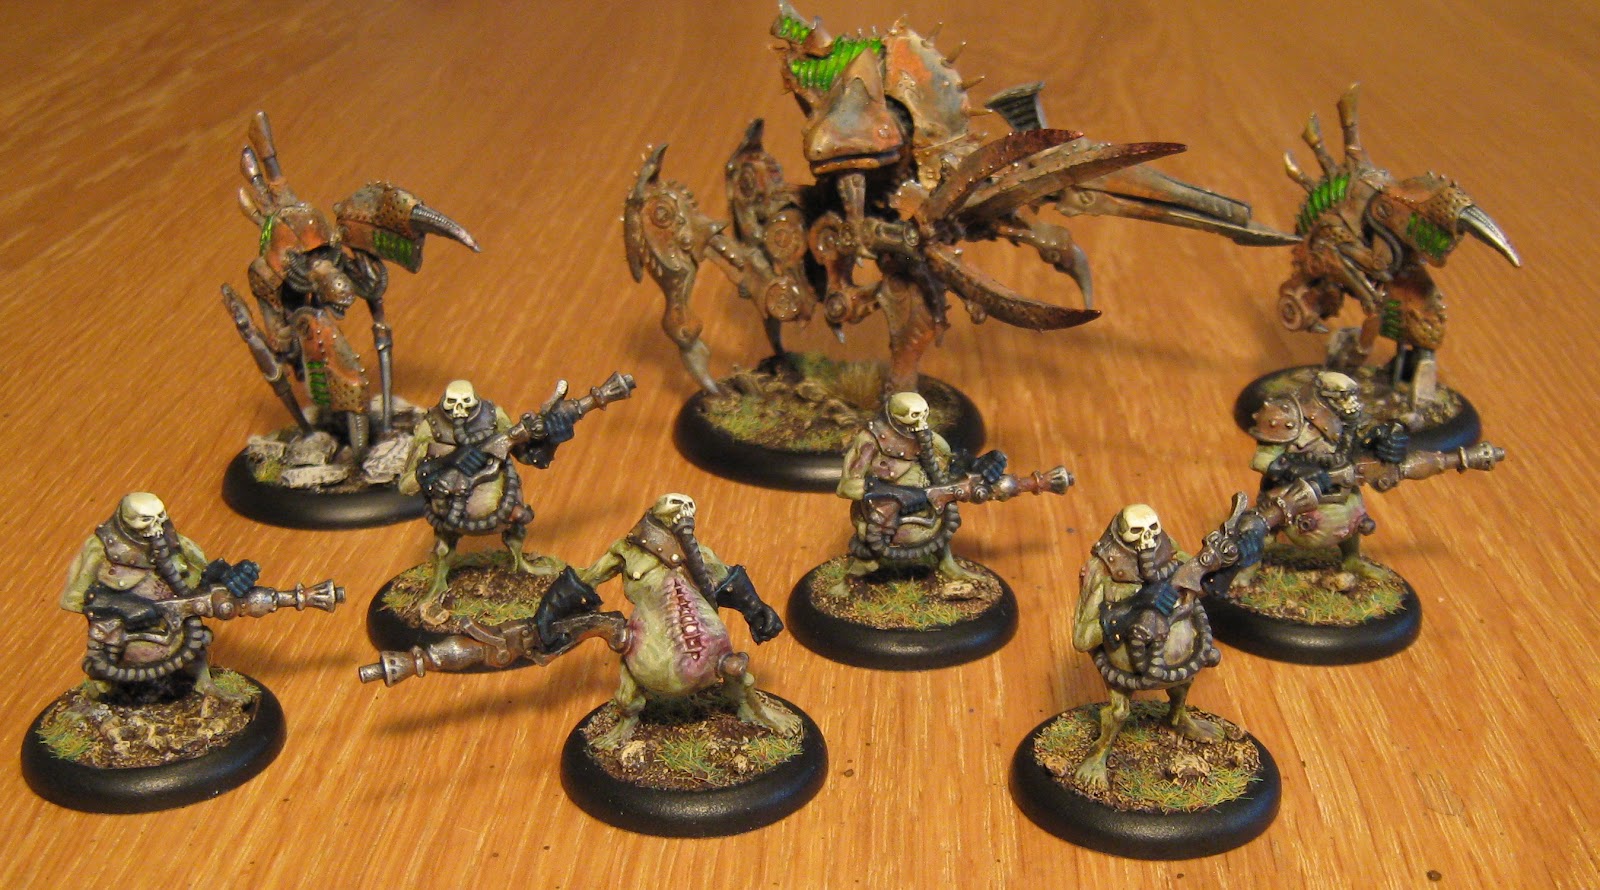
And there you have it. Hope you found this tutorial helpful.


'Til next time.

Saturday, July 21, 2012

Bile Thralls, Stalkers and Harrower

Still working on Steamroller lists for Warmachine. And as I work on the lists, it seems I need more units to fill them out. So here is the batch for this week.


I've resisted picking up Bile Thralls for a long time, simply because I'm not a fan of the models. However, I need to add an anti-infantry component to some lists, and honestly, there are no better infantry killers in the game than Bile Thralls. So...here's the unit.


I run a Mortenebra list, and up until now, it has only really had one assassination vector with an overrunning Harrower. But here are a couple of Stalkers which should make the list a bit more fatal to enemy casters.


Several Steamroller scenarios call for the use of reinforcements. In order to keep the tier bonuses for Mortenebra, I need another Harrower that's able to come in on game turn 2.


On the 'jacks, I've continued to use the weathering pigment technique for that rusted and dusty look.


Steamroller tournament today up in St. Albert. I'll try to take some snapshots and post on how the games went.

'Til next time.

Thursday, July 12, 2012

Warmachine Display Board

I'm out of town for the weekend, so thought I'd do a quick mid-week update.

I've been wanting to do a display board for Warmachine for a couple of months now, and I finally got around to ordering one of Fool's boards from Cool Mini Or Not. This arrived at the end of last week, and it's a solid non-warping wooden board.


Preparation was quite easy. I sprayed the surfaces black, and added glue and sand just as if I was doing a normal miniatures base. I then painted the upper surface dark brown, and drybrushed the sanded areas orange-brown and off-white. Glue + static grass and it was just about done. I then went in and added a few tufts of grass from Army Painter's tuft sets.


And...presto. A nice Warmachine display board.


Not much else to say other than I really recommend this style of tray. It's solid and the fit for the bases is great.


'Til next time.

Saturday, July 7, 2012

Dust: 3 Projects at Once

OK, on to Dust Warfare. I like the rules, but have not played yet. I'm hoping to get a game in with a friend at work sometime over the next two weeks. I think I'm going to like it. With that in mind, I've started working on an Axis army, and I have three projects for this currently underway.

The first piece is a repaint of the Axis medium walker. I'm about half-way finished at this point. The main camo colors are down, and now I need to move on to weathering, decals and detail work...and the base.


I really like the Dust vehicles (makes me think of Gear Krieg). The Dust infantry, however, makes me throw up in my mouth. So, I'm going to proxy all infantry pieces for my army. I'm starting with a base of Artizan German Late War infantry for all standard Battle Grenadiers. The army I'm putting together will use 3 sections of these, along with the command section. I have a number of figures already good to go for these units...


Though I do have a number of slots to fill, mostly with panzerknackers and radio men. So, I've got a number of figures underway to fill out the sections, and a few more on order from Artizan.


I'm also doing a section of Laser Grenadiers and a Hero figure. For these, I'm using 40K figures from Forge World. These are Death Korps troopers, who fit the Weird War II theme perfectly. These beautiful resin figures went together quickly, and look like they will paint up quite nicely.


Well, I don't know what project I'm going to finish first, but when I do, I'll post a step-by-step on the painting of them/it.

'Til next time.