Showing posts with label RPG. Show all posts

Saturday, July 7, 2018

Weathering a Servohauler

This sweet little model is one of the ski-fi tractors in the Galvanic Servohauler boxed set from Games Workshop. I really liked this guy, so I thought I'd spend some extra time on it and turn it into another sic-fi vehicle weathering tutorial.


Assembly is first, and straightforward. There are only a handful of parts in this model. Next, the whole thing is base coated brown.


Next came a sponge application of latex mold builder. The latex was focused on raised edges, and areas that would have seen a lot of wear.


In a few minutes, the mold builder was dry. The model was then oversprayed white to prepare it for the yellow base colour.


Spray yellows!


In a few minutes, the yellow paint was dry, and it was then time to rub away the latex. Using my thumb and fingers, this was just a matter of rubbing away the rubber. This revealed the "rust" brown base paint underneath.


Next, all other details were painted in. This included the tracks, antennae, exhaust pipe, engine block and so on.


The fuel tanks for the torch-laser thing were painted red and blue. A lot of weathering paints were coming next...so the bits I did not want weathered were left to be painted at the very end. This included the rubber hoses, headlamp and external wires.


To start the weathering process, the model was sprayed with a clear gloss lacquer. The whole thing was then given a light wash of Agrax Earthshade.


Much weathering ensued...and you think I would have taken some photos. Well, here are the colours used in progression instead. Left to right. Where ever there was going to be rust, Snakebite Leather went down first. This was watered down, applied, and then "erased away" with a damp brush. Same for the Orange Brown that went down next. And the Scorched Brown. Walnut Brown was used for deeper pits on the chassis surface. Finally, Yellow and off-white were mixed and used to highlight the upper edges of the major rust chips in order to represent caught a reflected light.


The model was also treated with Corrosion and Rust technical paints. Corrosion in the deepest recesses, and Rust on the end of the exhaust pipe. The engine block, and some greasy areas of the model surface were also treated with these vallejo weathering acrylics to represent oil and fuel spills.

I should also mention that the tracks were painted with Vallejo Track Primer, washed with Nuln Oil, given a few spots of rust, and then finally dry brushed lightly with silver.


And, there you have it. As mentioned, at the end, hoses, wires and the headlamp were painted in.


Really a fan of neat little models like this. They add a lot of character to a game table.


As you can see, when the rust colours were applied, they were streaked down the sides of the chassis.


There are two other models in the servo hauler set. I'll do one other for sure (have it assembled and primed now).


'Til next time.

Saturday, June 16, 2018

Eisenhorn

Finally finished up the Eisenhorn figure I picked up two months ago. Resin, and with a few problems that resin brings (e.g., warped staff), the sculpt is nevertheless very detailed.


It came with a nice base too.


I'm not a big fan of game fluff, but I've really, really enjoyed the Eisenhorn books by Dan Abnett, along with his Ravener and Pariah series.


'Til next time.

Wednesday, June 6, 2018

Warscryer Citadel

Games Workshop recently re-released their Skullvane Manse terrain kit as an AoS piece called Warscryer Citadel. Whatever you call it, it's a unique and cool terrain piece. I've just recently finished mine.


To move this large kit along, the airbrush was used extensively. Starting with the stonework of the citadel.


This was the paint progression for the worked stone.


To get the worked stone visually separated from the surrounding rock work, I painted the natural stone starting with purple, then worked up to lighter colours with more tonal variety.


Thus, this paint progression for the rocks.


Anyway, after those base colours were laid down, and I had sprayed the wood sections, everything else was brush-painted. And honestly, it went pretty quick.


Lot's of cool geometry in this kit.


Don't know what I'll be using it for, but I desperately wanted one right after the original kit went out of print. Happily, it came back!


'Til next time.

Monday, October 17, 2016

A Dozen Assorted RPG Figures

Our group's RPG game has moved to the desert, so it was time to step up and paint some figures on sand bases.


These are Minions of Set and Lions of Mitra from Otherworld Miniatures. They've just recently been released in their "Judge's Guild" line, and are made for...of all things...the Dark Tower adventure module from 1980. What a find! Dark Tower was my fav adventure game product from that era.


These Mummies and Undead Lord are from Reaper. 


Here's a weird one. The Guardian Naga, Omphalos, again from Otherworld. Kind of creepy.


And finally, this Giant Snake is from Reaper. Did a quick Google search on Diamondbacks and got good ideas for the paint scheme.


'Til next time.

Saturday, July 16, 2016

More Silver Tower Denizens

Almost two months in, and I can see the end of the Silver Tower painting project...just not quite there yet. However, this week, I got a lot closer by finishing off the 8 Chaos Familiars and 2 Deathstalker models.


The Familiars are great little models; full of whimsey. There are the walking books, the fish, dragonettes and..."moon-headed guys"...whatever they are. I felt I had the freedom to really go to town on these guys and just make up all sorts of outrageous paint schemes. So, that's what happened.


The Deathrunner model was pretty cool. I had done some Skaven last year, so was familiar with how I'd approach doing this guy.


A simple paint scheme, but the model is strong enough to show off with just minimal paint attention.


Well, all that's left on the adversary side of the game is the Ogroid and Gaunt Summoner. They are next!

'Til next time.

Monday, July 11, 2016

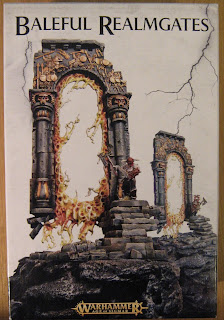
Baleful Realmgates

GW has a pile of new terrain pieces out for Age of Sigmar, and these Baleful Realmgate models caught my eye. A short build and painting project to make up for the pitiful gate model I've been using in the D&D game.


Hmmm, the paint job on the box art is much more impressive. Think I'll throw this box away an imagine I never saw it. ;^)


'Til next time.

Saturday, July 9, 2016

Painting Skeletons: Step-by-Step

When it comes to assembly line painting lots of figures for a table-top army, it doesn't get much easier than skeletons. Here's a quick way to get lots of skellies on the table.

First, the main set of painting operations are laid out here for you. White base coat, a home-made dark wash, bone, umber and then aged white.


So, I've started with some skeleton archers from the GW Tomb Kings Skeleton Warriors box. Here, assembled and based with sand.


The simple process begins with a base coat of white spray.


Next is a brushed-on coat of home-made dark wash. The recipe is pretty straightforward: floor wax, a little black paint and a little dark brown paint. Finally, a touch of matt medium to take the shine off. Here, the base coated white models are on the left, and the dark-washed models are on the right.


Next comes a light overspray of Vallejo Skeleton Bone. You can see it applied to the models on the right in this photo.


The next step is a glaze of Umber Wash. That's Umber Wash mixed with some Vallejo Glaze Medium. Here, the skeletons on the right have the glaze layer applied.


Finally, each model gets a final spray of Aged White, just from the top down.


Once all the bone is done, it's time to paint in the few details on the models. This includes the bows, quivers and a few bits of armor and jewelry.


And then it's time to finish off the bases. These are done with the Foundry Base Sand set of colors. Quick and perfectly fine table-top quality models. Ready for just about any game system you care to use.


'Til next time.

Monday, June 20, 2016

Cultists Slip Into the Workflow

These 10 guys have been sitting on my painting table, and my game table, for several months now. I just needed to finish off a few details in order to clear them for good. And that happened today.


These are the multi-part, hard plastic figures from the Frostgrave collection. Pretty cool models, and every one you build is unique. I swapped out a few torsos and other bits from the Frostgrave soldiers box as well. Everything in this line is pretty good. Recommended.


I like the Frostgrave game, as well as these models. Not as detailed as metal, or recent GW releases, but still really solid for all sorts of gameplay.


Next up is more Silver Tower stuff.

'Til next time.

Starting Into Silver Tower

I recently picked up the new GW boxed game, Silver Tower. There's a pile of cool new miniatures in this set, and I immediately started into painting this 51-model project.


First up were the Kairic Acolytes. I started with them because they seemed to be the easiest pieces to tackle. Lots of skin. No faces to paint. Simple white loincloths and big-ass weapons. Check, check and check. I mounted them on some Secret Weapon resin bases.


Reports are that this game is quite good, and I'm looking forward to playing it. But first...more painting. Next up are the Tzaangors.

What's up with all the crazy-shitty new miniature names from GW? Anyway, the sculpts are great.


'Til next time.