Sunday, November 29, 2015

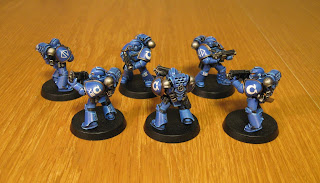
First Batch of 30K Space Marines

Well, after last week's test figure, it was time to dive into the Calth 30K project. These models are time-intensive. I'm spending over 2 hours per figure, when you factor in parts cleaning, assembly, and the many stages of painting. Is it worth it? Well, after having played several games of Betrayal at Calth, I'd have to honestly say, yes. The game is very fun, and it's certainly enhanced with a good set of figures.

So, here are the steps I took to get game-ready.

1) Parts cleaning and assembly. A few of the sprues in the box have mould lines, but the pieces clean up pretty quick. Assembly is easy enough as well, however, each figure comes in a LOT of parts (10+). So this does get tedious. After the figures are cemented, they're tacked onto the infamous painting stick.


2) Priming. I prime white to get brighter end colors.


3) Pre-shading. I don't think this is necessary...but habit forces my hand here. I'm using Model Air Dark Sea Blue.


4) Base color. I lay down an even coat of Game Air Ultramarine, and then highlight spray some Model Air Light Sea Blue.


5) Block out the black. All equipment, hoses, and metal areas get an even coat of black.


6) Silver. For the metal areas, I've used Vallejo airbrush metal surface primer.


7) Gloss coat and black wash/black lining. Black lining is a big part of the GW painting style. To facilitate putting this down, I gloss coated each figure and then used a black wash to hit the panel lines and do all the shading. I also hit all the metal areas with the black wash as well to shade them.

8) Shoulder pads. Shoulder pads are to space marines as shields are to ancients. They get their own special treatment. I painted the pads on the sprue, since they are small and fussy. After the base coats were down, they got a gloss spray and decals. The gold trim was also picked out at this time, then given that black wash.


9) Finishing passes. The gloss figures were then sprayed flat with Dullcoat. Details and final painting came next. This was a very time consuming step...about 40 minutes per figure. Black equipment got a highlighting drybrush of grey, and the bolted gun cases were given specular highlights. All the panel lines on the armor got highlighted with mixes of Ultramarine and Light Sea Blue. The red-yellow eyes were painted in. The metal was given a highlighting drybrush with GW Chainmail. Finally, specular highlights of White/Light Sea Blue were added to the armor, and the finished shoulder pads were glued on.

As a final touch, the gold rims of the shoulder pads were highlighted with P3 Radiant Platinum, and light blue highlights were drawn into the inner upward-pointing curves of the pads.


I've ordered in some custom bases for the entire Calth set...just waiting for them to come in before gluing these figures to their final bases.


Update: Now with bases from CoolMiniOrNot.


I'm going to move over to the Terminators next. Got a game on Tuesday, and want to get them at least partially painted first!

'Til next time.

Saturday, November 21, 2015

Warhammer 30K Test Figure: Tactical Ultramarine

If you've followed this blog for any length of time, you'll be aware that I'm not a GW fanboy. Sure, I have a Lizardman army for Warhammer Fantasy, and I sure enjoy some of the "specialist games" from those British Vampires at GW...and yes, I love Middle-earth, so I have too many of their LOTR figures. But really. I drew the line at 40K. Never played it, never wanted to play it. Stupid, unbalanced game. Way too expensive. Blood-sucking army book sales strategy.

And just while I was getting comfortable with my anti-GW smugness and gleefully looked forward to that abominable company's inevitable demise...they went and did this:


A specialist game (in the vein of the excellent Space Hulk) set in the Horus Heresy 30K universe. Screw you, GW, and your infernal stratagems to get my money!

This is essentially a box designed to counter all the hate I have against GW. It is packed full of beautifully sculpted 30K Space Marines and Terminators...at a so-reasonable cost of about $3 per figure. A tight little game system, perfect for small scenario play.

I couldn't help myself.

I was proud to say that I'd never painted a Space Marine. That is, until now. I'm all in. The Shame.

So, before starting into the nearly 40 figures of the boxed set, I decided to try a test figure to see if I could match the GW painting style.


The GW "style" is very different from the way I normally paint. It produces a distinctive "caricature" of a figure, as opposed to the more "naturalistic" style I usually go for. So, I watched a few YouTube videos and tried my hand at bold coloration, black-lining and strong specular highlights.


After a few attempts on this test figure, I think I have most of the techniques down, and believe I have something that approaches the GW house style.


I've been frantically gluing together squads of marines, or "tactical legionnaires" as they are called in this set. Now I've started into some squad painting, and have decided that 5-at-a-time will be the way I'm going to tackle this box.

Starting with the Ultramarines.

'Til next time.

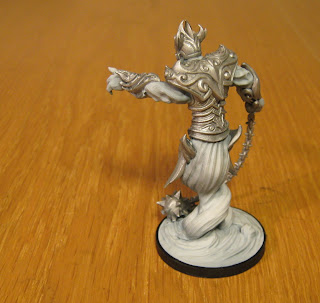
Four Elemental Myrmidons

I'm impressed with the new Gale Force 9 line of D&D figures. I painted the Hill Giant a few months back, so I thought I'd try some of their Elemental Myrmidons.

These four limited run figures each come cast in a plastic resin. The material holds great detail with very few (if any) air bubbles. Each figure averages about 8 parts, which fit together quite nicely. A little putty was required on the Water and Air elementals, but that was about it.

Here, the figures are assembled, primed and inked.


I started with the body colors on each figure. These were all sprayed on in layers. Additionally, the Water and Earth Elementals got a blue and umber wash, respectively.


After the bodies and bases were finalized, each figure only required its armor and weapons to be painted. Pretty easy project, overall.

The air elemental armor was kept very light in color, to stay in the air cloud theme.


After spraying flat, I went back in an drybrushed some more light silver over the armor.


A put a little rust on the Earth Elemental's armor, and finished up with a flat clear coat.


The weapon is a boulder held within the roots of the tree trunk.


By far my favorite figure of this group is the Water Elemental. The sculpt is outrageously good, with plenty of detail. The water was moulded nicely as well. I put a faint blue glaze over the armor.


The miniature was finished with a gloss coat to keep it watery-looking.


Fire is really tough to paint and get close-to-right. I was pretty happy with how this turned out.


The fiery body was juxtaposed with a blackened armor shell and two scimitars.


Well, I'm still a believer in the Gale Force 9 figures. Haven't been disappointed yet.

'Til next time.

Wednesday, November 11, 2015

Ruined Tower: A Large Terrain Project Step-by-Step

For the last two weeks I've been working on a large terrain project: this ruined tower, which is part of a Bones release from Reaper.


It's from a boxed set called Dragons Don't Share. The main feature of the box is a really big (and nice) dragon figure. But what caught my eye first was the scenic base that the dragon is supposed to be perched on.


So I started with the terrain set from the box. As is usual for Bones products, it's made of a funky, soft white rubber (or something rubbery). The ruined tower came in about 6 (warped) pieces. After gluing a few of them together, I liked how the ruin looked, and I decided to turn it into a fairly significant terrain project.

I started by gluing the main ruin pieces down on a cork sheet. I then glued down a number of slate rocks to enhance and tie together to various tower and ruin bits.


I then broke away the outlying portions of the cork sheet and glued what remained down to a metal pizza pie plate from the local Dollar Store. I knew I'd be using a lot of white glue in the project, which shrinks as it dries. This inevitably leads to base warping unless you have a really rigid base. Well, metal is quite rigid...so I went with that. 

I first laid textured masking tape down on the back of the pizza pie plate, so that the white glue I'd be using would have something that wasn't smooth metal to adhere to.

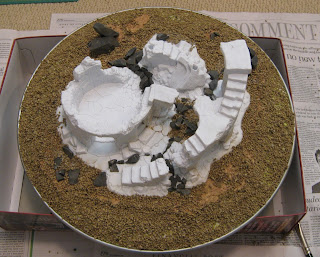
After the main cork base was attached, tallus pebbles were glued down to the entire base. This would form the foundation of all the groundwork that was coming up, and blended the main cork base to the pie plate.


 Next, I put down a layer of more fine-grained sand. In this shot, the sand is just in the process of going down. The idea here was to get a smoother (but still textured) groundwork base down.


After that dried, I used up a can of black spray primer and got everything base coated.


Now the airbrush got a workout. First, the soil areas were sprayed with different shades of dark brown and earth colours. Then the rockwork got coated with several layers of dark and light grey.


Brush painting was next. The stone was stained with several different washes, and was then dry brushed with a couple of light beige tones. The soil was then cleaned up with burnt umber, and ultimately dry brushed with orange-brown and off-white.


The first static grass layer went down next.


And now we skip past several tedious steps to get to the end product. Essentially, the ground cover was enhanced with several passes of alternately coloured flock. After that dried, tufts and wildflower patches were added to the ground and the ruined stonework. Moss, in the form of very fine dark green flock, was added to the ruins at this point...


...along with some ivy crawling up the side of the tower structure.


Anyway...a fair bit of effort, but the result is a pretty cool terrain piece that, despite the warpage of the Bones rubber, is a very playable scenic base.


I don't know when I'll get around to painting the dragon from this boxed set...but it is nice, and I'm hoping for a good end result. In the mean time, this ruin will be used for role playing sessions and a few Frostgrave games for sure.

'Til next time.