Friday, October 26, 2012

Western Desert '42 Micro Armour: Step-by-Step

Last week my buddy Dave came by. He wanted to sift through my stack of old GHQ Micro Armour packs to put together an Italian '43 scenario. He grabbed about 15 packs, which was nice, since that put a dent in "old inventory"! After he left, I started rooting around in the Micro Armour bin and realized that I had enough '42 Western Desert stuff to put together a game as well.

Just can't resist these lovely GHQ models!

Here's a reminder photo to show old (and new!) hobbyists just how small and beautiful these little gems are.


My interest in Western Desert gaming goes back to when I was a kid and picked up Tobruk. At the time, this was a pretty sophisticated simulation of company scale armored combat. Today, we'd just call it beardy and over-complex...or simply unplayable. But I'll have to admit, when I was in my early teens, I really got off on rolling 40 "to hit" rolls for my Bofors 40mm AA guns. Some years later, Squad Leader came along and did what Tobruk was trying to do much more elegantly. Well, elegant for the late '70s anyway.


Because of Tobruk, I understand that the Gazala battles of May and June 1942 in Libya were the crucible that Rommel forged his reputation on. Taking Tobruk was his greatest victory, and the desert tank battles that led up its capture were truly epic. There were literally hundreds of British, German and Italian tanks conducting running battles through the desert at this time.

These are the battles that Micro Armour is made for...or so it seems to me.

I busted out 56 assorted pieces of Micro Armour. Here's the step-by-step process to get them ready to game.


Assembly is pretty simple...except for Marder IIIs. For some reason, each piece comes in  5 parts. What a headache! I glued the pieces down to 1" square metal bases and applied fine silicate sand for ground cover.


Sprayed everything in white primer.


Then applied a dark wash (standard floor wax, black-brown paint and matt medium).


The British pieces (on the left) got a spray of Air Model Sand. The German pieces (on the right) got Air Model Light Brown.


Everything then got a thin sepia wash. The British pieces were drybrushed in off-white (P3 Menoth White Highlight), while the Germans got two drybrush layers (GW Bleached Bone, then Menoth White).


Bases were then painted in Foundry Sand shade and drybrushed with Sand highlight. I also painted on disruptive dark olive camo for the British Grants and Crusaders.


Final steps were to paint MGs, tracks, bedrolls, tools and any other details. Here are the finished pieces.

The German Panzer IIFs and IIIGs.


Panzer IV F1s and Marder IIIs (mounting captured Russian long 76.2 mm AT guns).


British M3 Honeys.


British M3 Grants and German 88s. On the 88s, I did not detail-paint the crewmen. Concession to project speed.


Finally, British Crusader Is and Valentine IIIs.


I usually put decals on Micro Armour, but this time around I took a pass. When you check photos of German armor at this time, most markings are covered over with dust or have been stripped off by sun and sand. British armor was being thrown into battle so quickly, many units did not have time to apply a full set of markings. Also, bypassing decals got the project off the table quicker!

Hope to get these guys into play at the club soon.

'Til next time.

Wednesday, October 24, 2012

Mortenebra vs pButcher

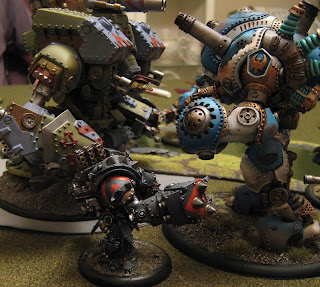
This week's Warmachine battle report is another Year Long League game (this time at 50 points) with Elliot. Big news this week...Elliot has finally finished painting his Conquest. Here it is. Awesome.


This week, Elliot brings pButcher while I play a tier 4 Mortenebra list. The scenario is Sacrifice. Opening set up below. I'm playing first. In the photo you can see the control zone (paper circle), along with the flag (top left quarter). Note, the zone is 12" diameter, but our circle is only 8"...so zone extends 2" out from paper circle.


Elliot's starting position. He has pButcher, Conquest, a Kodiak and Berserker, a unit of Bombardiers, Greylords, Eliminators, mechanics and the Koldun Lord.


My starting position. I have Morty, six Slayers, a Harrower, two Stalkers, Necrotechs, Scraps and a couple of Warwitch Sirens. My plan is to do a right hook with the Harrower to get into Elliot's backfield and try to get off an assassination. Failing that, I intend to flood the zone with Slayers and go for a scenario win. The first problem...I have to cross a river to get to the zone.


My turn 1. Harrower takes off with Spectral Steel. Slayer brick fords the river.


Elliot's turn 1. Elliot has built the slowest possible Khador army. Even though he doesn't have to cross the river to get to the zone, I will likely get there first. Anyway, he moves the Kodiak off towards the flag on his left flank.


My turn 2. I make the zone and get set to charge into Elliot on turn 3.


On my left flank, I send off the Stalkers to gum up Elliot's flanking Eliminators.


Elliot's turn 2. His Bombardiers lumber up to the zone. Teaching me a lesson, he charges a Stalker with his Eliminators and wrecks it. Elliot begins an on-fire dice rolling streak that lasts the entire game. Argh.


My turn 3. In the picture below, you can see the Harrower I've Overrun into Elliot's support staff. The Harrower threshers away three mechanics and gets three hits in on the Conquest, knocking out about half of the colossal's left side. Unfortunately, pButcher was too far away from the charging Harrower to be targeted. But you take what you can get.

Closer to the scoring zone I've whacked the Eliminators, a Bombardier (to trigger the Harrower Overrun) and am up in the Berserker's face.


Still on my turn 3. On the right flank we get a perfect illustration of why Khador 'jacks are stronger than Cryx 'jacks. My charging Slayer scratches up the Kodiak's paint job.


Elliot's turn 3. The Kodiak, with two fist attacks, knocks the Slayer down to just a couple of hits. He then triggers his chain attack and throws the Slayer at Deryliss. Hit. Both of my models are brought down to a single hit point.


Continuing with Elliot's turn 3, he feats and several of my models melt away due to all the boosted damage he's delivering. The carnage fest also overwhelms the Harrower. Booo.


My turn 4. The mistake that loses me the game. I should have popped Mortenebra's feat this turn. I thought about it but believed I might still get into pButcher in the late game and would need Morty's re-rolls at that time. As it turns out I cleared the zone for a scenario point except for Elliot's Berserker, which I brought down to one hit point. With the feat re-rolls I easily could have destroyed the Berserker and scored my first scenario point. I had landed Shadow Bind on Conquest and had ringed the zone to prevent any other Khador models from getting in. A second and final scenario point would have been easy to score. Totally lost opportunity.


Elliot's turn 4. Elliot continues his very successful attrition strategy. I'm down to just a couple of healthy 'jacks.


My turn 5. Realizing my mistake from last turn, I feat now, clear the zone again and score a scenario point. I have the approaches to the zone blocked up again, so it is still conceivable that I could win on scenario. To prevent the Conquest from toeing into the zone, I move up a medium-based Necrotech, hoping that it will survive any shooting attempts to clear it away and thus tie up the colossal.


Elliot's turn 5. The Koldun Lord needs a 5 to hit and a 6 to kill the Necrotech with his spray attack. He makes both rolls.


The Conquest is now freed up to charge Mortenebra (and get into the zone). Elliot still needs big rolls to hit my 'caster, but (with dice still blazing) he lands one and that was enough. Game over.


Another close and very fun game. I just wish I could end Elliot's current winning streak!

'Til next time.

Sunday, October 21, 2012

A Pair of Hunters

The Cygnar sideshow continues. This week, I'm posting some photos of a pair of Hunters.


These are popular Cygnar light 'jacks with armor-piercing guns and the ability to avoid free strikes when withdrawing from melee.


I'm sticking with the light blue scheme that I started with last week's heavies, the Defender and Ironclad.


I haven't tried these guys out on the table yet, but I'm looking forward to see how they will perform.


'Til next time!

Sunday, October 14, 2012

Detour into Cygnar: Defender and Ironclad

Warmachine work continues. Cryx is finally off the table, and a return to Menoth is on the horizon. To bridge the gap, I've decided to take a side trip into Cygnar. Several months ago I picked up a painted Stormwall colossal from my friend Jarrett Lee (Minijunkie.com). I've decided to build up a force around that great model, using Jarrett's colossal as a painting style guide.

First two models off the table are a pair of heavy 'jacks: the Defender and the Ironclad.


Here's another pic of Jarrett's Stormwall...I'm trying to match the blue with my new Cygnar units. I'm also trying to replicate Jarrett's weathering techniques.


The Defender has a great Cygnar gun (the faction is known for its guns).


The blue is a progression of Vallejo French Blue and Light Sea Blue, with a finishing highlight spray of P3 Frostbite.


The Ironclad is Cygnar's standard cheap heavy.


He has an earthquake hammer which can affect models within 2", but otherwise, he's not that special.


OK, I have a number of upcoming Cygnar models, which I'll post pictures of over the coming weeks.

'Til next time.

Wednesday, October 10, 2012

Battle Report: Kraye vs Harkevich

Elliot and I got together for another Year Long League match last night. The league is still at the 45 point level through October.

OK...I'm trying a new faction. I've put together some Cygnar units to go along with my Stormwall model. So...new faction, new 'caster, new units and abilities. I'm thinking I'm going to lose (and I do), but you have to break some eggs to make an omelet. 

I'm starting out with Kraye, who supports Stormwall nicely with boosted ranged attacks. I also have a Defender, Ironclad, Boomhowlers, Journeyman, Strangeways, Squire and 3 Stormcallers. My plan is to screen the Stormwall with trolls and use my guns to hammer the opposition. Stormcallers maneuver to take out support staff. I don't like the Ironclad in this list, but at 45 points, I can't afford the Stormclad.

Elliot brings Harkevich, his Conquest, Black Ivan, Wyshnalyrr, a unit of Ironfangs, the Gobber, Aiyana and Holt, and the Greylord guy who powerboosts.

We roll up scenario #16, Command and Control. The is a radial game and the opening setup is like so... Elliot is on the left; I'm on the right.


Elliot's set up. The Ironfangs are poking out behind the Conquest.


My set up. Kraye is behind the Defender.


Elliot has first turn. He advances. The control zone (the grey paper circle) is in the center of the board and can be seen in the foreground.


My first turn. Boomhowlers lead off with super-tough and Arcane Shield.


Another view of my first turn move. You can see the covering fire templates screening my Boomhowlers from a potential Ironfang charge. First Lightning Pod is out at the top of the picture in order to set up future triangulation attacks. My Ironclad has Full Tilt and is flanking through the marsh.


Elliot's turn 2. Disaster for me. He gets rid of all but one of the trolls with ranged attacks. Super-tough does not save them. He sets up a screen of Ironfangs. His strategy is like mine. Screen the shooters and lob shells.


My turn 2. While I started the game planning to Stormcall onto Elliot's support staff, they are too far back. However, the Ironfangs are prime targets. Seven go down to lightning attacks. I force an incorrect ruling on Shieldwall vs Stormcall...but I cranked most of the damage rolls which would have overcome the shield bonus anyway. Otherwise I would have felt much worse. We got the proper ruling after the game...

The Journeyman puts Arcane Shield on the Stormwall. I deal 12 points of damage to the Conquest with ranged attacks. Boomhowler (the only troll left) moves off into the left hand forest.


Elliot's turn 3. The Ironfangs are no longer an effective screen. He sends them off against my flanking Ironclad and clears his charge lanes to my Stormwall. First he feats and Broadsides to clear away the Journeyman and soften up my colossal. His mechanics clear all damage off his Conquest. The charges then severely damage Stormwall, leaving him with just 16 boxes. Black Ivan got his crit Brutal Damage. Dang.


Reverse angle. Still on Elliot's turn 3. The Ironfangs put the hurt on Ironclad, taking out both arms.


My turn 3. I'm in trouble. Under Harkevich's feat, his Conquest is armor 23. Even if I throw everything I have at it, I can't bring it down. I try anyway. This does not work. Surprise.


Elliot's turn 4. Stormwall is scrapped, along with what remains of the Ironclad.

My turn 4. Strangeways gives my Defender 'jack Evasive. I'm about to lose the game, so I have to go for a Hail Mary assassination attempt on Harkevich. Defender slips behind Conquest, hits Harkevich with his cannon and delivers 9 damage. Not nearly enough.


Elliot's turn 5. The end. Broadsides softens up Kraye, then Black Ivan delivers the coups de gras.


A fun and complex game. This was the first time Elliot and I had played colossal-on-colossal. There were lots of ability interactions and it was interesting for me to try out a lot of new spells and unit capabilities. Holy cow, are Stormcallers good. No wonder everyone loves Stormwall and the Lightning Pods it spits out. It is quite easy to get triangulation attacks with plenty of nasty angles.

I'll need a lot more practice with Kraye before I start to feel comfortable with him. I'm more interested in playing him at 50 points, when I can exchange the Ironclad for a Stormclad.

'Til next time.