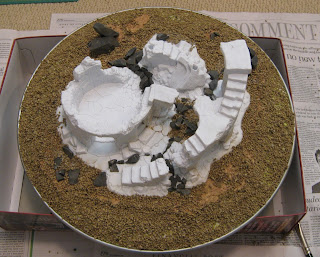
For the last two weeks I've been working on a large terrain project: this ruined tower, which is part of a Bones release from Reaper.
It's from a boxed set called Dragons Don't Share. The main feature of the box is a really big (and nice) dragon figure. But what caught my eye first was the scenic base that the dragon is supposed to be perched on.
So I started with the terrain set from the box. As is usual for Bones products, it's made of a funky, soft white rubber (or something rubbery). The ruined tower came in about 6 (warped) pieces. After gluing a few of them together, I liked how the ruin looked, and I decided to turn it into a fairly significant terrain project.
I started by gluing the main ruin pieces down on a cork sheet. I then glued down a number of slate rocks to enhance and tie together to various tower and ruin bits.
I then broke away the outlying portions of the cork sheet and glued what remained down to a metal pizza pie plate from the local Dollar Store. I knew I'd be using a lot of white glue in the project, which shrinks as it dries. This inevitably leads to base warping unless you have a really rigid base. Well, metal is quite rigid...so I went with that.
I first laid textured masking tape down on the back of the pizza pie plate, so that the white glue I'd be using would have something that wasn't smooth metal to adhere to.
After the main cork base was attached, tallus pebbles were glued down to the entire base. This would form the foundation of all the groundwork that was coming up, and blended the main cork base to the pie plate.
Next, I put down a layer of more fine-grained sand. In this shot, the sand is just in the process of going down. The idea here was to get a smoother (but still textured) groundwork base down.
After that dried, I used up a can of black spray primer and got everything base coated.
Now the airbrush got a workout. First, the soil areas were sprayed with different shades of dark brown and earth colours. Then the rockwork got coated with several layers of dark and light grey.
Brush painting was next. The stone was stained with several different washes, and was then dry brushed with a couple of light beige tones. The soil was then cleaned up with burnt umber, and ultimately dry brushed with orange-brown and off-white.
The first static grass layer went down next.
And now we skip past several tedious steps to get to the end product. Essentially, the ground cover was enhanced with several passes of alternately coloured flock. After that dried, tufts and wildflower patches were added to the ground and the ruined stonework. Moss, in the form of very fine dark green flock, was added to the ruins at this point...
...along with some ivy crawling up the side of the tower structure.
Anyway...a fair bit of effort, but the result is a pretty cool terrain piece that, despite the warpage of the Bones rubber, is a very playable scenic base.
I don't know when I'll get around to painting the dragon from this boxed set...but it is nice, and I'm hoping for a good end result. In the mean time, this ruin will be used for role playing sessions and a few Frostgrave games for sure.
'Til next time.


FYI when it comes to the out of the package warping that is common to bones, a 1-3 minute (depending on piece size) submersal in boiling water will loosen the plastic and allow it to reset to its natural position (just use tongs to keep it off the bottom of the boiling pot). In this state it can also be shaped/bent to your own preference (within reason of course). To set it, submerge it in ice cold water and it will hold its new shape.
ReplyDeleteGood job on the terrain!
Nice work on that! and very playable too, which is key for this sort of gaming.
ReplyDeleteI particularly like the mixed ground cover, gives it a naturalistic look.
Very very nice job on these ruins!
ReplyDeleteExcellent work on the bones ruins! Consider that idea stolen... ;-)
ReplyDeleteGreat job. Hated how the terrain warped, even after the the hot water treatment. Good to see a way to get around the warpage! Now to find my copy if I ever get around to painting it! :P
ReplyDelete